MAKER & CRAFT GUIDE
How to measure a tumbler wrap
The capacity on the product listing is not a wrap measurement. Find the printable surface on your actual blank, then choose a rectangular or curved template that fits it.
The short version
Measure the usable height between the top and bottom boundaries of the printable surface. Measure the circumference around that surface, or multiply its diameter by π. If top and bottom circumferences differ, do not force a rectangle onto the tapered area: measure both ends and use a curved template.
1. Find the part you can actually print
Inspect the blank and its supplier template first. A lid, rim, shoulder, curved base, handle, or uncoated band can reduce the usable area. Measure the smooth, printable section—not the overall tumbler height or its advertised capacity. Where a supplier marks a print boundary, use that boundary.
Mark the top and bottom limits lightly on a paper strip. Measure the distance between them for the printable height. Wrap a flexible tape or paper strip level around the body at that height to measure circumference. Keep the strip snug without stretching it. If you use a paper strip, mark where its ends meet and measure the marked length flat with a ruler.
If you measure the diameter instead, measure straight across the body at the printable area—not across a lid—and calculate circumference:
Circumference = diameter × πFor example: 3 in × π ≈ 9.425 inMeasuring around the actual blank with a flexible strip is often easier than estimating its diameter. Check the fit against the supplier template before committing to a transfer.
2. Is the printable area straight or tapered?
Measure around the body near both the top and bottom of the intended print area. If those circumferences are effectively the same and the sides are straight, a rectangular wrap is appropriate. If they differ, the surface narrows or widens; a rectangular full wrap can wrinkle, leave gaps, or drift at the seam. Use the tapered tumbler template generator with the top diameter, bottom diameter, and printable height. If you measured around each end with a strip, divide each circumference by π to get the corresponding diameter the tool requests.
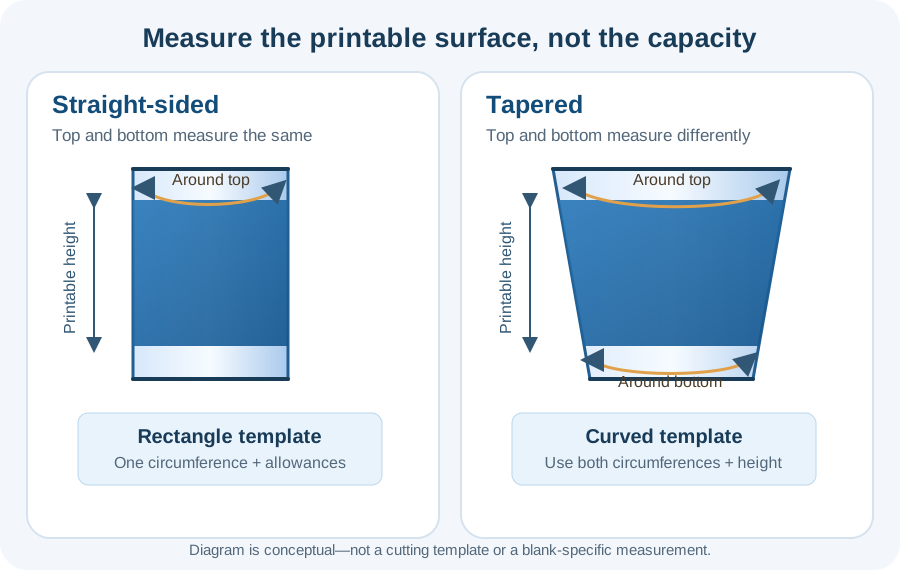
A slight taper can be hard to spot. The top-versus-bottom strip test is more reliable than judging the silhouette by eye. If your printer, press, or blank supplier specifies a different template or safe zone, follow those instructions.
3. Decide on seam overlap and bleed
The base circumference covers the body once. Seam overlap is extra artwork beyond that distance when a pattern or process calls for one edge to pass the other. Bleed extends artwork beyond a finished edge to protect against slight alignment variation. They serve different purposes; neither amount is universal. Use your supplier or transfer workflow’s requirements, and enter zero when an allowance is not needed.
For a straight-sided wrap, with bleed entered per edge, the full exported artwork dimensions are:
Artwork width = circumference + seam overlap + 2 × side bleedArtwork height = printable height + 2 × top/bottom bleedKeep important text and logos inside the intended visible area, away from the seam and trim edges. The bleed and safe-area calculator can help visualize those margins. For a tapered blank, use the curved template’s own seam/bleed controls and inspect its fit; the straight-wrap formula above is not a substitute for its shape.
4. Worked example: a straight blank
Suppose you measure 9.25 in around a straight printable body and 8 in of usable height. Your process calls for ⅛ in seam overlap and ¹⁄₁₆ in bleed on each edge. These are illustrative measurements and allowances, not a standard size or a recommendation for every tumbler.
Width = 9.25 + 0.125 + (2 × 0.0625) = 9.5 inHeight = 8 + (2 × 0.0625) = 8.125 inAt a 300 PPI planning target, the full artwork needs at least 2,850 × 2,438 pixels: 9.5 × 300 = 2,850, and 8.125 × 300 = 2,437.5, rounded up to a whole pixel. Your blank or print-system supplier may specify a different target. The straight tumbler calculator handles the dimensions and pixel math using your own measurements.
Check the exported design—not a low-resolution preview—with the sublimation image checker. Adequate pixel dimensions cannot fix a blurry source; see the resolution guide for that distinction.
5. Do a plain-paper fit test
- Print a draft on ordinary paper at 100% or actual size. Turn off “fit to page” or other automatic scaling.
- Measure a ruler or test line on the printout to confirm the software printed at the intended physical size.
- Trim only as your final workflow requires, then wrap the paper around the blank. Keep its top edge level.
- Check the top, bottom, and seam. Look for gaps, bunching, excess overlap, or artwork entering an unprintable area.
- Adjust the template from the measured fit and repeat before using transfer paper or pressing the blank.
For tapered blanks, a paper test is especially useful: it checks that the curved outline lies flat against the actual surface. Save a copy of the measured template for that blank; do not assume a similarly named product from another brand has identical dimensions.
READY TO SIZE YOUR ARTWORK?
Use the measurements from your blank
Enter actual dimensions in the straight or tapered tool, then check the resulting artwork before printing. PixGauge processes selected image files in your browser, without uploading them to our site.